Monday, June 20, 2016

A little of this and that

What have we been up to, you may ask?  We have been working on some small projects around the house, but sometimes find it hard to get motivated to move on to the bigger projects we still need to finish.  After working all day, the Hubs is tired and needs to relax.  We try to knock things out on the weekend but again, it's hard to get going when you just want to relax.

I've been messing around with my gardens, crafting and trying to get out and get some exercise during the day, along with keeping up the household chores.  Whoever said not working was easy, probably didn't have many hobbies!  Or keep up a household either.  So many things to do...yet so little time in the day!


So let's see...what to mention first??

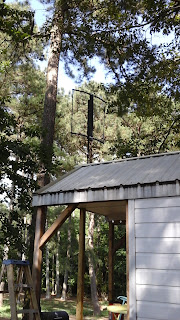
Antenna!  We made our own long range digital outdoor antenna.  We are in a dead spot for cellular and digital TV reception.   We could only pick up a few channels on our TV.  We tried a few "long range" store bought antennas that just didn't work and cost a lot.  So the Hubs got busy looking for ideas.  Enter in INSTRUCTABLES!!!  The best DIY site ever!

He found plans to build your own outdoor antenna for little of nothing.  And we had a lot of the materials already.  So he built one and we ran a coax cable from the antenna to our TV and started to program our TV.  A few minutes later and what do you know.....we had 63 channels!!  We are getting channels from as far as Athens GA!!  We also pick up radio stations!  It's fantastic.

I wish I had been around to take pictures of how it was built but the Instructable is very easy to follow and I will add a link to it after the pictures of ours.


It's a bit hard to get a good clear picture of it due to it being black and the trees causing it to blend it but the Instructable has great pictures.
http://www.instructables.com/id/Build-a-Large-DB8-HDTV-Antenna-Big-Bertha/


And now ....Gardens!  I love gardens and all the fresh produce we get.

I have a standard garden bed where we grow tomatoes, peppers, squash, zucchini and cucumbers.  Got a late start this year so it's not as big as I'd like.

We also built a worm tower container garden.


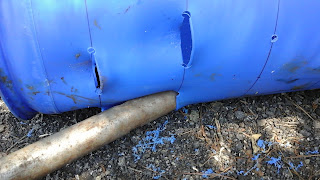
 Hubby came home with this awesome plastic 55 gallon drum from work that held a soap wash for parts.  Non-toxic and perfect with a good cleaning.

 We had to drill holes into the sides and cut the pocket space.  We were able to put 4 rows in with 8 pockets in each row.

We used a heat gun to heat the plastic up so that we could bend out the pockets.  This step did take a while as you had to heat each pocket area and then wait for the area to cool around your spacing object before doing the next one.

We used a piece of old metal pipe to bulge out the pocket.  Once it set for a bit while we were heating the next hole, we could remove it and use it for the next.

Tada....barrel completed.  On to the worm tower.

We used a 6 inch wide piece of pvc tube and drilled holes all around it.  The last line of holes is several inches below the top level of dirt.

We cut a hole the size of the pipe in the bottom of the barrel so that it would stick out just a bit and used a scrap piece for a band to hold it into place.  We then screwed the band to the pipe inside the barrel to keep it from sliding down anymore.  We bought an end cap for the bottom, so you can remove it to empty the composted black soil out now and then. 

We built a sturdy wooden stand for it and screwed it to the bottom of the barrel to keep it upright.  Once done, we filled it with our soil and added plants!   


We added a small bit of hay, soil and garden scraps into the tube and added about a 100 red wiggler composting worms to get started.  We bought a slide on cap for the top to keep bugs out and the smell down.  As you can see...it's doing quite well.  We add more scrapes daily, along with our egg shells and coffee grounds. 

The idea is that the worms go into the tube via the holes and eat the scrapes.  They then burrow through the garden soil and leave their castings or worm poop for us first timers.  This helps provide loose soil for the roots to grow well and fertilizes the plants as well.  Also, the composting matter will leak out any liquids into the soil as well...also known as compost tea...very beneficial to plants.  

It's  wonderful cycle...all ending with wonderful herbs, veggies and even some strawberries, once they bloom.  Anything not eaten goes right back in as scrapes.  The use of fresh herbs in meals is wonderful!  


Lets see...what next??

I bought a coffee bean sack at the market and made a curtain for the cat litterbox area.  I just cut to fit, stitched it up along the edges using twine and used a tension rod to hold it in place.  It covers the box perfectly and the cat can now do his business in private!  :D  


Okay.. think that's enough for this post. I'll try to have some more for you soon.  I'm experimenting with canning and some other projects.  Hope you liked this post and it inspires you to build your own.  :)
Friday, April 15, 2016

Check In....About time, right???

I know it's been a while since I've done a post...been slacking off.  Laid back tiny living has been great.  It feels so good to not have a huge rent payment and all the utility bills that come with a conventional home.

I recently quit my job and the Hubby has gone back to work.  It's been really nice to be able to take some time off from the rat race and just enjoy the days.  It's been getting really nice here in Georgia.  We have been keeping our windows open almost all of the time, something we couldn't do in our rental.  Most of the windows didn't open.  As I write this, I'm sitting here listening to birds chirping and the cows eating hay.

We added a shelf over the couch.  Hubby used a piece of the flooring and bent some metal hangers for it.  It will hold a lot of weight.  I'm planning to make some colorful boxes to hold stuff in, so you don't see so much clutter.


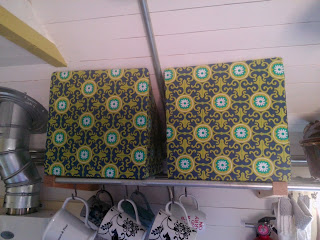
Hubby has been experimenting with coraplast.  It's corragated plastic...the stuff they make election signs and such from.  It's pretty heavy duty and lightweight.   I had him make me some boxes for the shelf above the sink.  It has a funny pitch, the backside of the box has to be shorter that the front.  I wanted some boxes that used all the space available.


He made me these using election signs we "harvested" for free and some aluminum rivets.  They hold a lot of stuff and make the most of the space available.


I used some colorful duct canvas material and spray adhesive to cover them and make them pretty.  I plan to do the other two in a bright contrasting duct canvas to mix it up a bit. Hubby is going to make me some spoon handles for them.


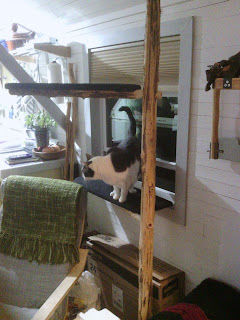
We brought our old cat scratching post with a carpeted box on top, when we moved.  Squeeky loved sitting in the window in it...just couldn't take that away from him.  It was clunky and took up floor space.  We noticed he liked sitting in the window behind my chair a lot.  He would perch on the box with our range hood in it (still to be installed) and even sleep there.  Hubby decided to make him a cat tree.  He found a cedar about the size we needed and made this!


It is screwed to the floor and ceiling.  The shelves are wedged into the trunk and then screwed in place so they don't move.  We had some left over carpet from the loft attic so he covered the shelves in it.  We added some rope for him to scratch at and a dangling toy to play with.  He loves it.  He sleeps on the top shelf a lot.


Let's see...what else? Not sure if I've already mentioned our heater....but here it is.

It's a propane catalyst heater...smallest one we could find. ..and it is AWESOME! We used it all winter and never went above the second setting.  It  has a temperature regulator and kicks on only periodically.  The pilot puts out a lot of heat itself.  It's very propane efficient as well. We would use a bottle or two more a month than the summer...which still put our gas consumption under $70 a month.  We plan to build a wooden frame around it with a shelf underneath later on.


I'm working on another rug for the house.. made out of old donated jeans.  It's almost complete, just have a few more rows to do.


We bought a cool chair from Ikea. It's really comfy and I usually sit in it. Found a pretty cool foot stool that serves dual purposes. It's metal covered in vinyl and padded on top.

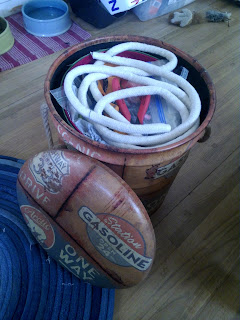
I store my current crafting project materials in it. And occasionally use it as a step stool...so I guess that's 3 purposes.   Squeeky likes it too. 


So, I think that's it for now. Will add more as we slowly get projects finished.
Thanks for checking in with us! ☺

Wednesday, December 2, 2015

Tiny House Living!

I'm sorry that I've not posted anything new in a while.  It's been a busy and hectic past few months.  We have been slowly working on tiny during the madness but it seems it was at a snails pace.

And yes, the title is correct...we have moved into our tiny home...FINALLY!!!   We've been out of our rental for a full month now and we're loving tiny living!  Now, this doesn't mean we are finished...we still have more to do but now the house is comfortable to live in.

It was a mad rush to get everything out of the rental by the 1st of November but we made it.  I have learned that my possessions owned me more than I owned them.  At first, I kept thinking that I should find good homes for things verses just getting rid of them.  I was able to do so with my antiques and such.  The closer the deadline came though, I was starting to sweat a bit at all the stuff left.  Finally, I started bagging things up and either donating the whole lot or throwing it away completely.  Being able to toss things in the trash was such a freeing feeling.

Once we got our stuff into Tiny, I realized we still had to downsize!  Really????  I may have a few bald spots from yanking on my hair!  We had to look at our possessions and "cut the fat".  We are still doing this a bit.  But we are getting things organized and in their proper place.  Since we haven't completed our second loft over the bathroom and other shelves, we are having to make do with the room we have.  The house looks a little cluttered but it's getting there and we can move around comfortably.

We have the propane hooked up and our little stove runs fantastic!  I am so happy with it.  It works better than my old full size gas stove.  The kitchen is laid out perfectly for cooking big meals, very space oriented.  We have been using the propane for the hot water in the sinks and for cooking and one 20lb bottle lasted us almost a full month.  We have recently installed a little propane heater but not sure how much it will use yet.  Only had to use it a few times on the lowest setting.

We haven't gotten the shower system finished just yet.  Luckily, we are only a few feet away from the shower in the barn apt we used to rent.  It's a bit inconvenient but worth it to not pay rent anymore.  We hope to have the shower done soon.

So that's a summary of how things have been going here.  Now for some pictures of our tiny house! Please excuse the mess. :)


We still have to build our overhead vent for the stove.  

Shelves need to be painted.

Our cat likes my handmade rug a lot.  

My stove has plenty of room for several pots at once.  I have used all four burners at once and had plenty of room.  Cooking up some brats here. 

We put up a black curtain to close off the bedroom.  It blocks the light from the front so one person can sleep while the other is still up.  It does help with noise as well.  

We have a hook to tie it back to when not in use.  This works great as I get up earlier than my husband for work.  He gets to sleep in while I'm getting ready.  

Our bedroom.  We put a shelf over the bed for books and such.  I made some simple burlap curtains for the side windows.  They allow light in but not a lot.  They help if you want to nap during the day.  

Looking down the hallway towards the front.  I have a small laundry bag that sits on top of the machine for dirty clothes.  Keeps a hamper from taking up floor space.   


So there you have it.  I'll be posting more soon...I promise.  We have a few things in the works now.  And will be adding more pictures as we figure out new ways to store things and make the most of our tiny home.  Thanks for reading!  :)

Friday, October 2, 2015

Entertainment Cabinet, Bed Ladder and Kitchen Shelves...Woohoo!

We have been suffering from some seriously wet days here in Georgia.  Seems like it's rainy all the time.  We have managed to get some stuff done.  We have been making Tiny more comfortable to stay in.  Running water and a coffee pot was a huge step, but what about when it's time to relax?  So, we decided it was time to move the sofa in.  Once we had that in place, we needed to get our new tv and get our entertainment cabinet built.

We bought a 32 inch flat screen.  It looked normal size in the store but in the tiny house, it looks HUGE!  When you're sitting only 7 feet away roughly...small is much bigger than you would think.  We got a new small blu-ray player as well...move time!!! :D

We wanted to house the tv in a cabinet that had a small storage area and had a fold down table attached as well.  Two in one kinda deal.  So, the Hubby got busy!  We used poplar and left over plywood.  Poplar because it really does look great stained.

We built the cabinet to fit perfectly around the tv.  There's enough room on the sides to put a standard 32inch in, in case we have to replace the one we have at any time.  There's enough room under it for the remotes.  Then we added a second shelf to hold a few boxes for odds and ends.  

Side view. 

 
We wanted the front of the cabinet to match with our other doors in the house.  Since the front is really a solid piece of plywood that folds down into our table, we decided to make fake doors on the front, Shaker Style. 

We cut the pieces to make the fake door.  We wanted to cover the ugly edge of the plywood so we beveled the edges of the trim pieces.

Laying the pieces out on the plywood to make sure they all match up smoothly.


You can see here how the pieces go past the edge of the plywood. The side ones will butt up flush to this beveled edge.

Better shot of the beveled edge.

Adding the edge band.

Gluing the table/fake door together and letting it dry.  Hubby learned a great trick to keep the glue from oozing out the cracks and showing in the stain.  Painters tape, that way you wipe it off the tape and it never touches the wood.  Genius, no??  :)

Front side.  


We added a wider shelf on the top to hold the blu-ray player and antenna. We drilled a hole in the back of the shelf to allow cords to go behind the tv.  We wired in a outlet strip directly to our on/off switch.  This allows us to kill the power completely to the devices so they don't pull a phantom load.  Even when off, your tv and such pulls power.  This is called a phantom load.  The outlet strip is mounted behind the tv so all the devices can be plugged in out of sight. 

We also added some slide catches to hold it up when we want to cover the tv.  We inlaid the catch plates into the bottom of the shelf.  The two pieces that stick down from the bottom of the cabinet are to keep it from swinging further back and hitting the wall or breaking the pins.  This is where the swing out legs will be to support the table in the upright position, once we get them made, that is. 


The table folded down.  It actually lays down flat but the stack of wood is holding it out at an angle.  

We made some hinge plates out of old steel and set them into the wood.  The are held in place by a bolt that allows for the table to hinge up and down.  The Hubby even rounded the edges so it's all nice and smooth.  There is a slight lip on the edge of the table.  Hubby added this for me when I am beading and such to keep things from rolling off...how considerate! 

So there's our entertainment cabinet!  I love how well it turned out.  The tv is a great size for the space.  We are enjoying being able to relax at night after a hard days work and watch movies..sitting on the sofa, not on lawn chairs!

Next up...our ladder to our bed.  We've been using a step stool...which is kinda tricky for me. It's not quite tall enough for me so I have to do this weird heave motion to get into bed.  It's funny to watch, so says the Hubby.  Also, at night, it's tricky to locate in the dark and I've come close to falling and busting my bum a few times.  I guess that would be amusing for the Hubby as well.  :)


Here's our ladder.  I don't have a lot of construction pics but I'll try to explain it well.  We used framing 2X4s that we planned down to size. The ladder was made on a slant and we added rubber tread on the bottom to keep it from sliding when you step on it.  The steps are inset into the side supports for extra support, other than just matching flush to them.  We glued and screwed the ladder together, using our beloved Kreg's Jig.


We used pipe as the attachment support.  We made some metal U shaped hooks that screw to the back of the ladder.  You can remove it and put it out of the way if you need to.  This keeps it firmly in place when in use also.  The reason one side rail is higher than the other is simple...it's to allow me to find the ladder in the dark and not break my bum!  Another considerate move on the Hubby's part.  I can find it with my foot in the dark with no issues!  :)

So, there you have it..our ladder.  It will be stained the same cabernet color the bed is...just not gotten that done yet.  And you can see my red wooden flying dragon matches the bedroom colors perfectly!


Now...kitchen shelving!  I wanted some of those metal bar shelves they sell on Ikea's website but none where the right size!  Frustrating, until my wonderful Hubby said he could make me some out of wood and conduit!  Yay!  Again, no construction pics.

Here's the one over the sink counter.  It spans the whole length and is solid!  The conduit runs through holes drilled into each of the wooden supports.  They are screwed directly into studs in the wall.  Very sturdy.  And they match the electrical piping already in place!  :D  We will be painting the wooden supports the same green as the cabinet trim. 

The nice thing is, I don't need curtain rods now either.  The conduit is close to the wall so I can hand my curtains from the one closest to the wall with some cafe curtain clips.  I'm currently looking for some neat tea towels or vintage looking hand towels to use as curtains.


The shelf over the other counter.  We also extended this one over the fridge and added a second shelf.  Its all one piece so it's very sturdy as well.  Made just like the other one and fastened to studs.

Again, same idea for curtains on this side as well.  The binders house our extensive movie collection.  We are about ready for a fifth binder!


The one over the fridge will house our dishes and glasses.  I plan to have some plexi-glass cut to size, so the they have a solid surface to sit on.  It will still give the appearance of being an open space.

So, that's what we have been up to lately.  We were glad to get a few smaller projects done during the rainy season here.  Next up....PROPANE!!!  Yes!!  I'm very excited to finally have gas!! Hehe... ;)